Everything you need to know about the new parental control options on iOS devices.
Earlier this year, Apple revealed a new “Screen Time” feature that would show users detailed information about how they’re using their devices, breaking down the amount of time they spend in each app, each category of app (like “games” or “entertainment” apps), and more.
The Screen Time feature is now available for users who update their devices to iOS 12, the latest version of Apple’s mobile operating system. It comes jam-packed with all sorts of tools and features that will help you control your kids’ screen time (and even your own).
We’re here to help you understand how all of these features work, so your family can make the most of them.
To set up Screen Time, head into your device’s Settings application, and then tap “Screen Time.” From there, you’ll be able to tell Apple whether you’re setting up these features on your own device, or one that will be used by a child. You’ll need to select the child option to have access to the full suite of parental controls.
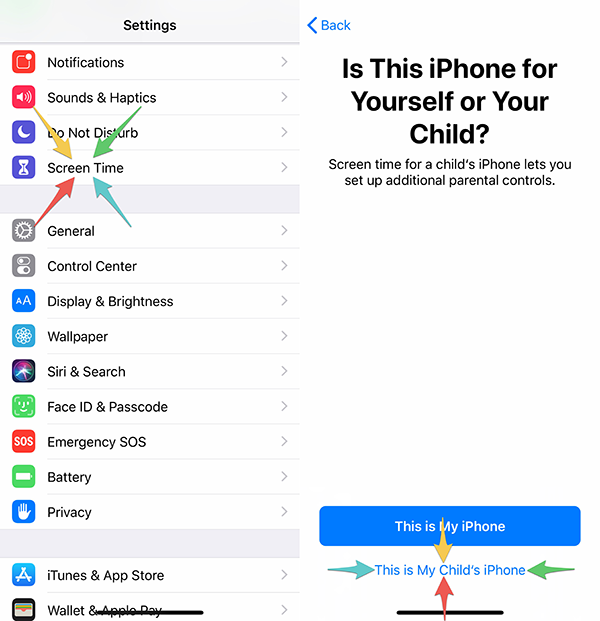
Here’s a breakdown of Screen Time’s major features.
Before we begin, it’s worth mentioning that you’ll need to create a four-digit passcode to use throughout the Screen Time experience. Make sure you choose a different passcode than the one you use to unlock the device (if there is one), if your kids know what that passcode is. If you use the same passcode, your littles may figure out how to change these settings without your knowledge or approval.
Downtime allows you to block access to most apps on the device between a start and end time that you set.
By default, the downtime window is set from 10:00 pm to 7:00 am, but you can tap each of these times to customize the window to suit your family’s needs. For instance, you may wish to turn on downtime when your kiddos are heading to bed, and only turn it off once they get home from school, rather than in the morning. These settings can be changed later on, so feel free to experiment with different ranges until you find the one that works best for your family.
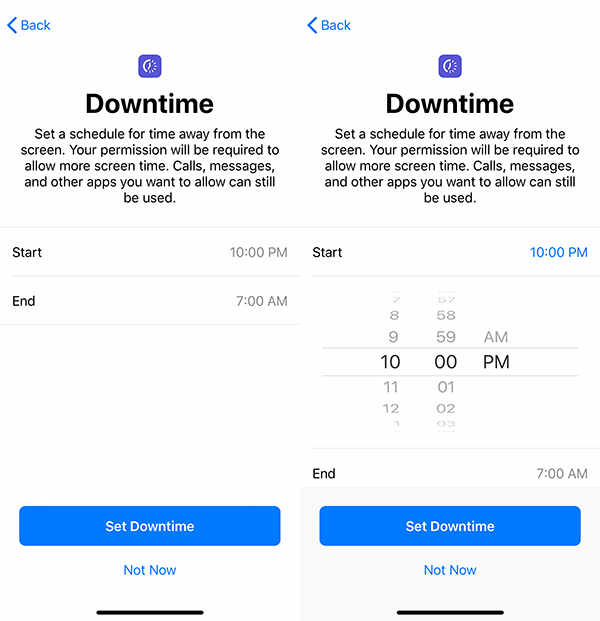
During downtime, calls can still be made on the device. You’ll also be able to choose any other apps you want to remain available during downtime. For instance, you may wish to limit your kids from playing games, but still allow them to read books.
To add an app to the “always allowed” category, tap “Always Allowed” on the Screen Time menu, and then tap the “+” symbol next to any apps that you want your kids to be able to access it all times, even during downtime. It’s worth mentioning that by default, Messages, FaceTime, and Maps are also allowed during downtime. Tap the “-” sign next to these apps if you want to stop your kids from accessing them during downtime. Please note that we’ve blurred out the apps on our own device in the screenshots below.
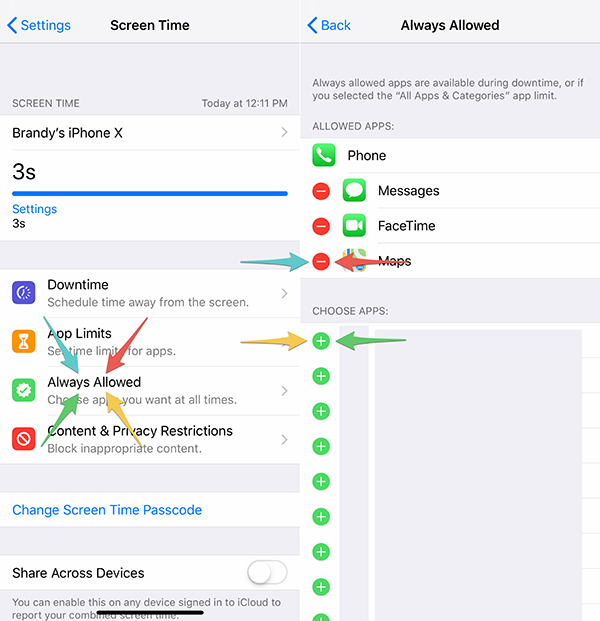
Five minutes before the downtime timer begins, a reminder will appear on the screen letting kids know time is almost up. If your kids ever want more screen time during the downtime window, your permission will be required.
The App Limits feature allows you to set daily time limits for how long your kiddos can use apps across a variety of categories. If you want to limit all apps equally, you can set a single limit for “All Apps & Categories.”
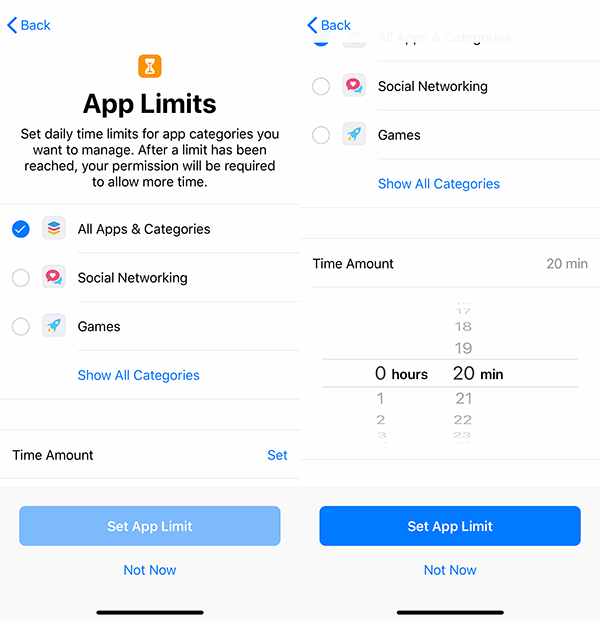
If you want to limit apps based on type, you can tap categories such as “Games,” “Social Networking,” “Education,” and more, and then set the time limit. For instance, you may wish to give kids 60 minutes of game time each day, but limit them to only 30 minutes on entertainment apps like YouTube. Time limits can be as low as one minute, and you can update and/or turn off these time limits at any time as you discover what works for you.
It’s worth pointing out that you can set your first app limit during the Screen Time tutorial (pictured above), but you’ll need to tap “App Limits” on the Screen Time menu to change this limit and/or add more.
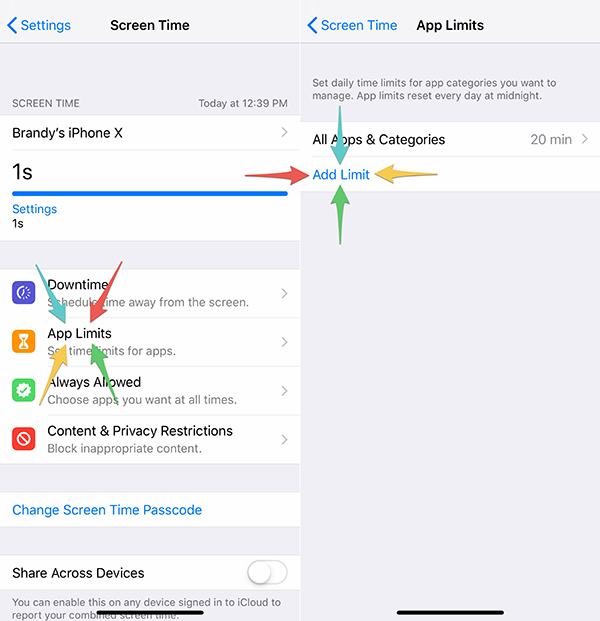
When you add an app limit via the Screen Time menu, you’ll also be able to decide whether you want the same time limit to be in place every day of the week, or change things up. For example, you may wish to give kids more times to play on their device on weekends than during the week. To do this, tap “Customize Days” when you are creating/editing an app limit. Then tap each day of the week to change the time limit for that app category.
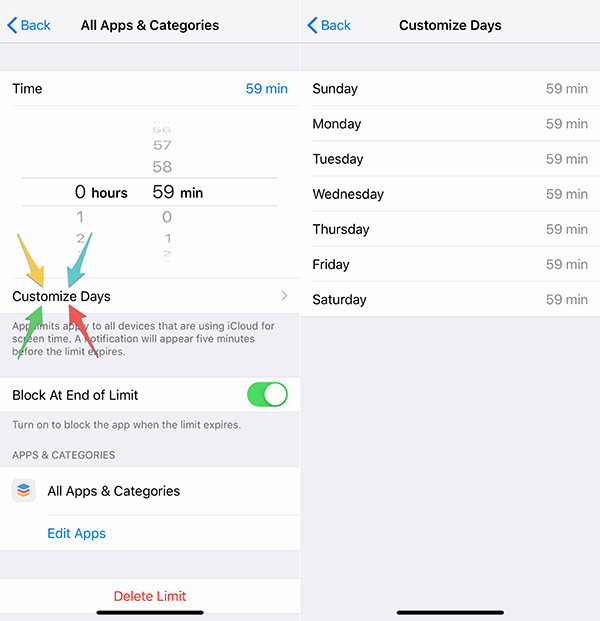
This set of controls allows you to block or allow a whole slew of permissions across apps like iTunes, the App Store, and even the web. To access these controls, tap “Content & Privacy Restrictions” on the Screen Time menu, and then tap the toggle at the top of the screen to unlock the ability to change these settings.
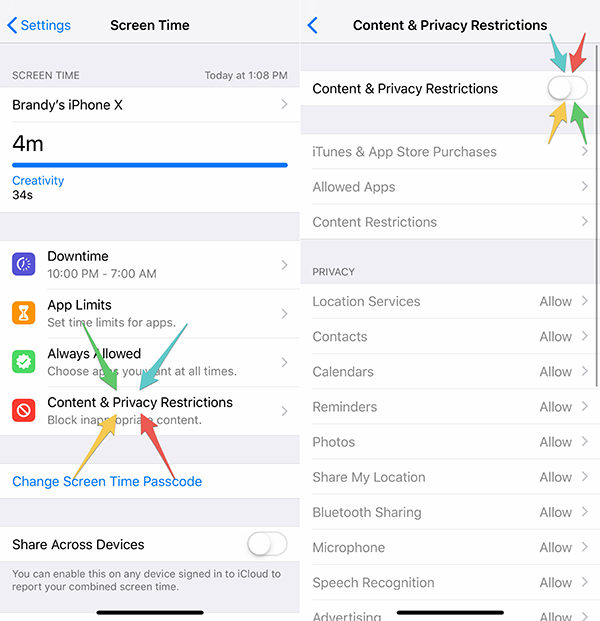
Tapping each of the options will allow you to change the default settings. For instance, tapping “iTunes & App Store Purchases” takes you to a screen where you can prevent your children from downloading new apps, deleting apps, and making in-app purchases while using apps.
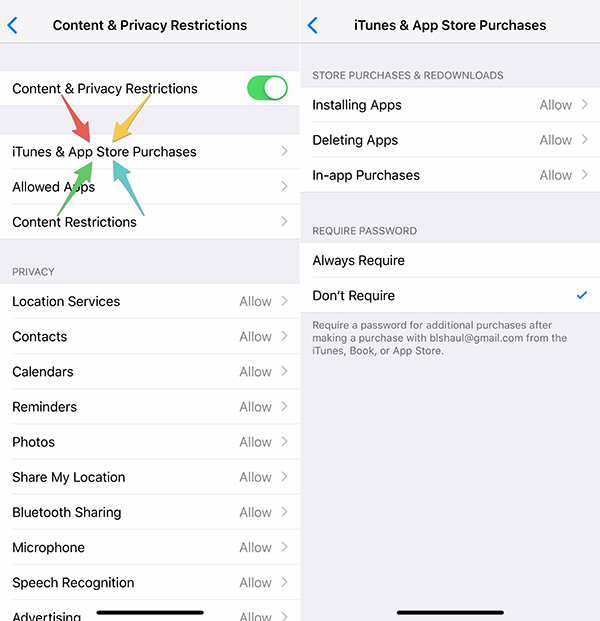
Another huge feature allows you to prevent kids from seeing adult/mature content as they use the device. To access these controls, tap “Content Restrictions” on the “Content & Privacy Restrictions” menu. On this screen, you can block your kids from accessing “Explicit” music, podcasts, news, and books, prevent them from watching movies and television shows with specific ratings (such as R or TV-MA), and even stop them from playing multiplayer games with other users online.
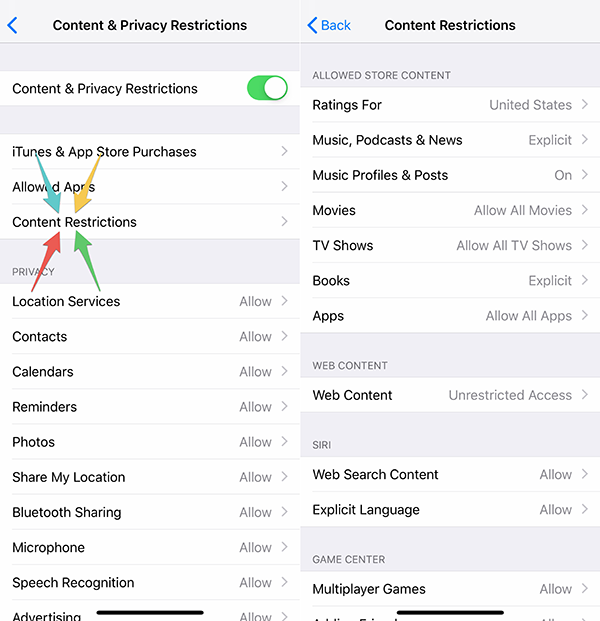
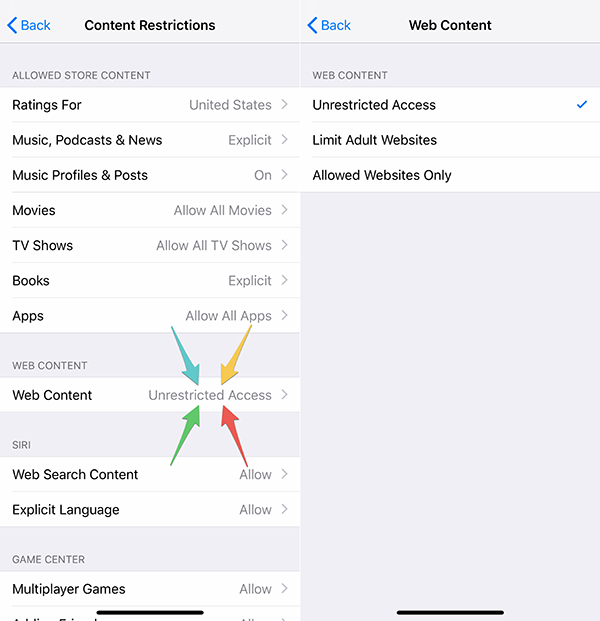
If you want to prevent your kids from visiting certain websites, tap “Web Content” on the “Content Restrictions” menu. From here, you can tap “Limit Adult Websites” to block your child’s access to adult websites while allowing all others, or “Allowed Websites Only” to make a customized list of websites that they will have access to.
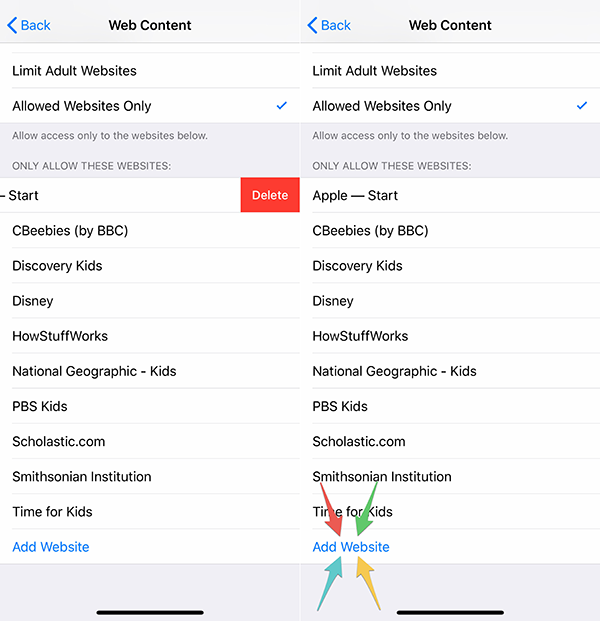
If you decide to create a list of websites, Apple will start you off with some suggested websites you may wish to allow your kids to access. If you don’t like any of them, you can swipe from right to left on them, and then tap “Delete” to remove them from the list. From there, tap “Add Website” at the bottom of the list to add as many new websites to the list as you want. To be especially clear, if a website isn’t on this list, your kids won’t be able to access it.
In addition to these major controls, you can also block kids from accessing certain apps and features on the device, such as Siri, Wallet, and the device’s Camera. You can turn off location services, block apps from accessing the device’s microphone or photos, and so on. There are way too many settings here to mention each one individually, so take a few moments to browse through the options and make your desired choices. Each menu provides an explanation for what your different choices will do.
Once you’ve activated Screen Time on your device, you can come back to the Screen Time menu at a later time to see a detailed usage report that shows how your child is using the device. You can see how much time your kiddo has spent using the device today or over the last seven days, view which apps they use most, and more. To see these reports, tap the device’s name on the Screen Time menu (in our screenshot below, the name is “Brandy’s iPhone X”).
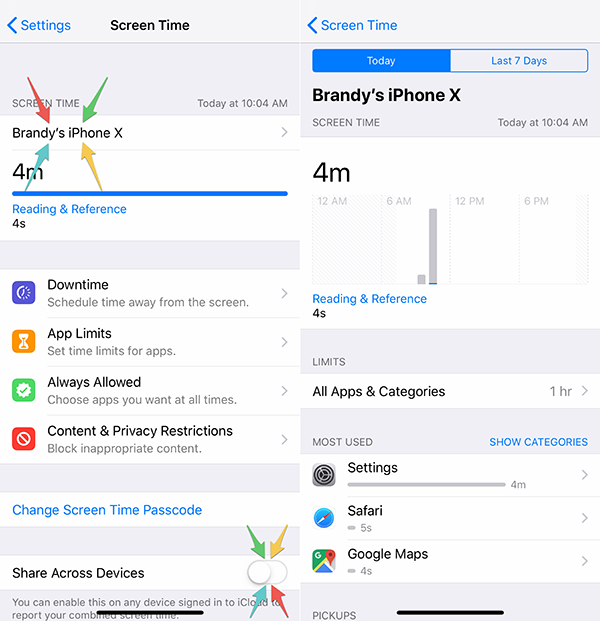
Finally, if your kids use more than one iOS device (for instance, an iPhone and an iPad), you can track their combined screen time by turning on the “Share Across Devices” toggle on the Screen Time menu (pictured above). This will track their combined screen time on any device signed into the same account on iCloud.
What do you think of the new Screen Time features in iOS 12? Let us know in the comments, or tweet us @superparenthq.
Brandy Berthelson has been writing about video games and technology since 2006, with her work appearing on sites including AOL Games, Digital Spy, and Adweek. When she’s not gaming, Brandy enjoys crafting, baking, and traveling with her husband.